Acura Legend Forum banner

So the swap begins (runnig out of time)

17K views 228 replies 28 participants last post by  Telion  
#1 · (Edited)
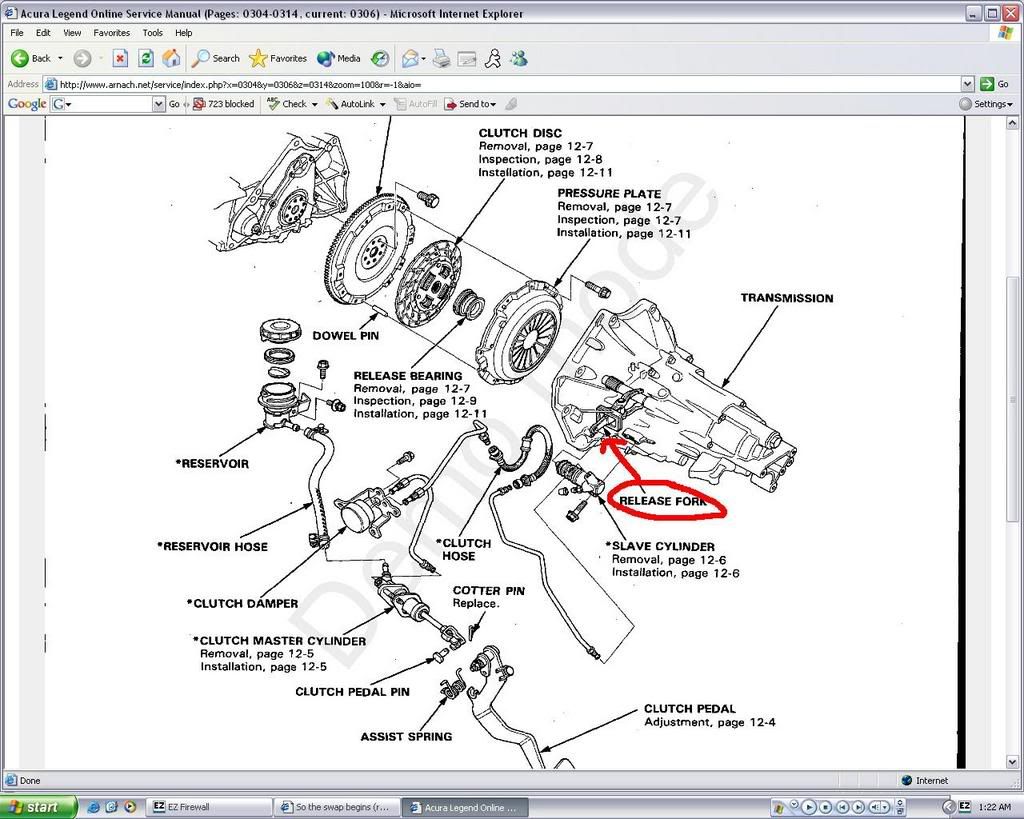
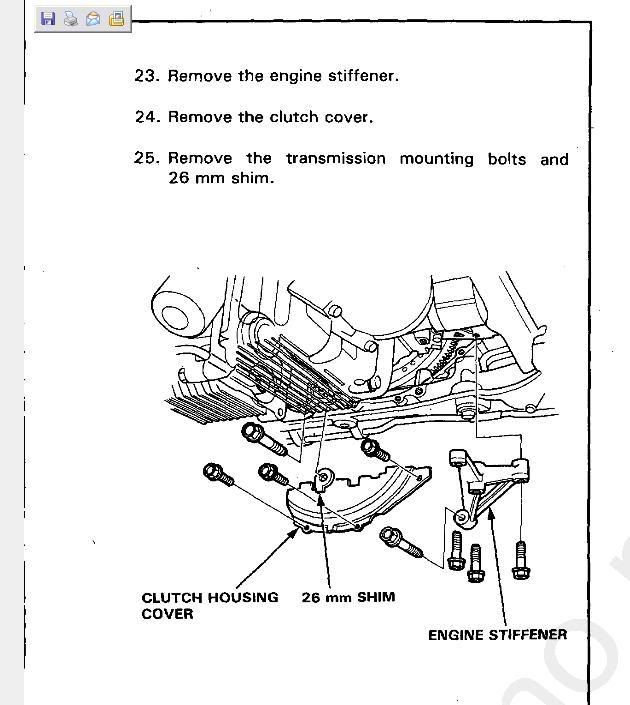
Ok this one was a solo shot and it took about 60 hours (yes 60) to get her out. of course had I done more home work and read the service manual (which I can provide the necessary portions for those to do this after me, it may have taken half that time. Later I will edit this post with some to do's and not to do's (that I did) and keep a progress report going from here. So without further-a-do,

Image


Image


Image


Image


Image


Image


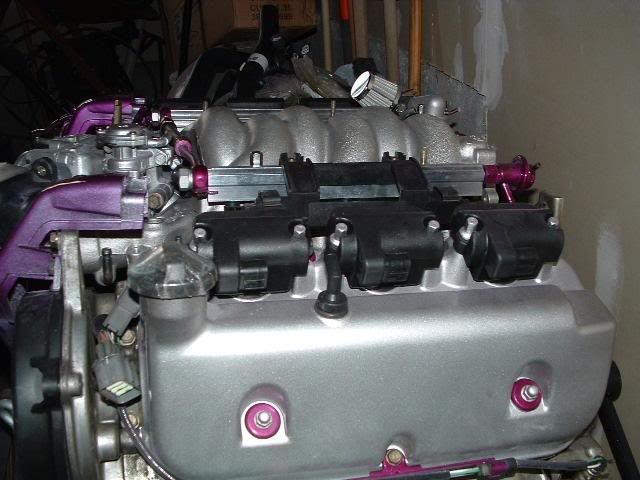
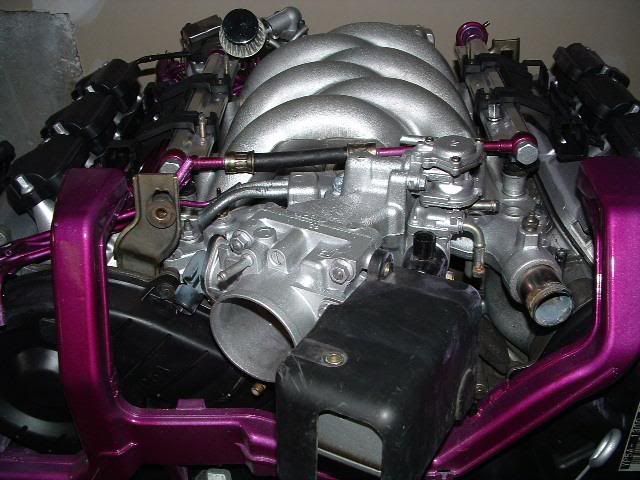
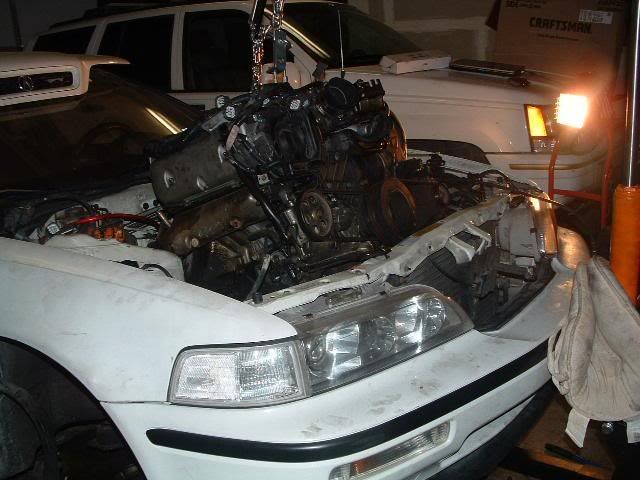
And of course a teaser pic of what is to come (it is outdated though, now has the TII manifold and cams)

Image
 
#2 ·
Good job. I would love to see your notes on removal when you are done as I have an engine waiting to be pulled. Good luck and God Speed with the rest.

one,
 
#5 ·
Thank you for all of your nice comments. Nupe I kinda quit take (physical) notes after my 18th step. I was going to try to do a step by step method but then became frustrated but I do have a lot of mental notes that I will document because there are several things that you just don' see in the swap threads thus far. Probably taken in as general knowledge or practice but later tonight I will try to get some more info and complete documentation sometime soon.

Ty: Oh man your tellin me I really hope to have this dine by NALM, it is going to be a close one sadly though I can definately say at this point that the track is out for me. I will not have enough time with the new engine in to feel good about a long trip to track it then to drive it back home.

Tony sorry no rainbows in this car's future. But thank you on the compliment for the color I can only hope that she runs as strong as she looks! As for a Dyno not till after NALM (if I mae it in time) if not I may have to rent a car or fly.

Here's another outdated teaser pic
Image
 
#7 ·
Interesting enough no, infact teh engine ran very strong right up to teh point that I pulled it. I am just a glutan for punishment. I am considering this a preventative measure because of the mileage and a few other areas of concern. I actually bought the car with every intention to swap the motor over to the 3.5 I was actually making engine negotiations at the same time as I was negotiating buying the car.
 
#8 ·
Looking good, I know thats alot of work to do by yourself with no help... did you have your wife getting her hands dirty with you :D? I'm glad you took my advice and pulled the whole unit out as one with the exhaust attached and used the load leveller - I think you will find it much easier to remove those bolts on the driver's side exhaust y-pipe now. Use a 6 point 14mm box-end wrench. Your about to see just how restrictive that y-pipe is.

-Matt
 
#9 ·
If you only knew how close I was to cutting the Y-pipe, it was perfect justification for replacing it with a custom one. I may actually still do that I am going to go to the shop that did my exhaust. And nah the wife didn't help but she is an excellent cook though:( And as for the load leveller I just don't think it is possible to get this baby out this way without one, especially by yourself. This should have only taken about 10-15 hours solo had I known what I know now.
 
#11 ·
Thanks not much yet it is a stock 3.5 with a ported TII manifold and cams, a aftermarket breather and megan racing FPR.
 
#12 ·
telion,

My type 1 basically hit the shitter. I am going to borrow my bosses truck during lunch break to get your mount to the machine shop like i promised.


you'll get your motor done in time.

ben
 
#15 ·
telion,

My type 1 basically hit the shitter. I am going to borrow my bosses truck during lunch break to get your mount to the machine shop like i promised.

you'll get your motor done in time.

ben
Thanks I appreciate you being on top of that, I took a couple extra days off to try to help the time factor a bit. My biggest current dehlima is this stupid knock sensor on the RL engine that I broke while removing the wiring harness a while back because I can't get teh intake manifold put back on till I replace this. Hopefully I will have that swapped over from the other engine by the time the mount gets here.
 
#14 ·
Thanks I hope this project continues to be inspirational and successful as I go so comments like that are motivating and mean alot! I hope this will also help make e more knowlegable about our cars overall, which it has proven to so far. This way I can be a more informative source for those to follow.
 
#17 ·
Indeed, and thanks yeah I am pretty excited and sore, but WTF it is worth it and I will get it exactly how I want it plus it will be very beneficial for future projects down the road to have this under my belt. Good luck to you too if you have questions feel free to hit me up (this applies for anyone as what I do know is still fresh in mind) I think those of us doing it should some how all get together to do a detailed documentation of the whole process I started to but by step 18 without seeing any real significant progress I though I am just going to have to do it and take pics as I go. I also have a service manual if you need one.
 
#18 ·
Ewe happy days I was able to successfully swap out the knock sensors $$$$ it can't be said enough ig you are going to be working around them remove them carefully these are not cheap.
 
#26 ·
Everytime I see someone preform a 3.5 swap, I get a smile on my face.

~Dv8
Once I get this baby completed and fired up there will hopefully be a smile on my face too:D
 
#21 ·
I have a great idea... instead of documenting your progress in a thread, why dont we use the new acura-legend.com WIKI, that way nobody is re-inventing the wheel and the whole process can be improved upon. I have done quite a bit of work on it so far but I haven't had the time lately, if all of us are contributing (the foundation of the wiki in the first place) it wouldn't be much of a burden.

If interested, PM me and I will give you the address as the wiki is not ready to go public yet. You are welcome to use any and all pictures that are in my thread and I assume Mike Diaz/Dv8 wouldn't mind using their pics either.

-Matt
 
#24 ·
I have a great idea... instead of documenting your progress in a thread, why dont we use the new acura-legend.com WIKI, that way nobody is re-inventing the wheel and the whole process can be improved upon. I have done quite a bit of work on it so far but I haven't had the time lately, if all of us are contributing (the foundation of the wiki in the first place) it wouldn't be much of a burden.

If interested, PM me and I will give you the address as the wiki is not ready to go public yet. You are welcome to use any and all pictures that are in my thread and I assume Mike Diaz/Dv8 wouldn't mind using their pics either.

-Matt
I think that idea is good too, I will include a lot of pics as well and any provided are good.
 
#22 ·
I wish you the best of luck Telion. I did a swap on my G1 a couple of months ago and I know exactly what you mean about 60 hours to get the first one out. I think the DIY is a great idea. I will definetly use it when I get a G2 which might be soon because the engine I swaped was way too strong for the trans.
 
#25 ·
Here are a few more pics I will add these first for AckRite

Image


Image


Image


Image
 
#27 ·
Ok I am stuck, I can't get my Diff or Tranny off so any tricks and tips you guys know let me know. PS teh extention shaft might be engaged so tips here will help too. So you know where I am stuck

Tranny: all bolts out and it is balanced on jack stands connected to the engine which is on the hoist but it won't come more than a 1/4 of an inch off? WTF.

Diff: All the bolts are out housing cover is off (diff fluid smells as always) and diff itself is out but I cannot get the housing off the engine. I can't remove the extention shaft. or the oil bearing seal. Please share your secrets on how to do these!
 
#28 ·
Ok I am stuck, I can't get my Diff or Tranny off so any tricks and tips you guys know let me know. PS teh extention shaft might be engaged so tips here will help too. So you know where I am stuck

Tranny: all bolts out and it is balanced on jack stands connected to the engine which is on the hoist but it won't come more than a 1/4 of an inch off? WTF.

Diff: All the bolts are out housing cover is off (diff fluid smells as always) and diff itself is out but I cannot get the housing off the engine. I can't remove the extention shaft. or the oil bearing seal. Please share your secrets on how to do these!
is the trans auto or manual?

to pull the extension shaft, pull the sealing bolt on the back right side of the bellhousing (bellhousing facing away from you). I believe it is a 1/2" square plug (use a breaker bar). Then, you use a screw to pull the shaft out.
 
#31 ·
Oh hell yes, Thank you Ranger Joe and Matt both I figured out how to get the extention shaft to release. I had a hell of a time getting the cap over it off so I checked to see what all turned when I turned the cap using the 1/2" drive and the who crank turned so I locked it up from the front side with a torque bar and was able to loosen the cap. Then I took a M8 (Ranger Joe) screw that was long enough for me to use the backside of a hammer for leverage to pop it out :Woot:
 
#34 ·
The engine can come out of an RL 96-99 (00') it has more torque I would do a search on 3.5 and look at all the recent posts on it for more info.
 
#33 ·
Help I cannot get the tranny off

Ok this is going to become a community project I can't get the Fing Tranny off am I missing something it seams to be stuck to the clutch or the flywheel some how and the service manual did a $#!t job of documenting how to get the tranny off. and yes the exention shaft is released. Help anyone chime in!
 
#35 ·
Ok this is going to become a community project I can't get the Fing Tranny off am I missing something it seams to be stuck to the clutch or the flywheel some how and the service manual did a $#!t job of documenting how to get the tranny off. and yes the exention shaft is released. Help anyone chime in!
Did you pull the clutch fork away from the release bearing to disengage it? Did you remove the dust cover over the flywheel?
 
#36 ·
I am not sure if the clutch fork and the extension shaft are the same I have removed the dust cover from the flywheel though. Is this it
Image
 
#37 ·
The dust cover I'm referring to is at the front of the trans, at the bottom of the bell housing. It's a sheet metal piece bolted in place with a few 10mm bolts. The clutch fork is the piece that the clutch slave cylinder pushes against when you depress the clutch pedal. Not related to the ext. shaft. If you don't pull the fork out it will definitely cause a problem in removing the trans. You can see the fork in this link.

http://www.arnach.net/service/index.php?x=0304&y=306&z=0314&r=-1
 
#38 ·
Hang in there with me I am going to upload another pic ok edited with this pic is this it
Image
 
#40 ·
Hey that is 10X more detailed than what I am working with. Thanks that is not in teh service manual F :nutkick:<- me