Acura Legend Forum banner

DIY - Shock Removal

26K views 22 replies 10 participants last post by  obrunning  
#1 · (Edited)
DIY - Shock removal
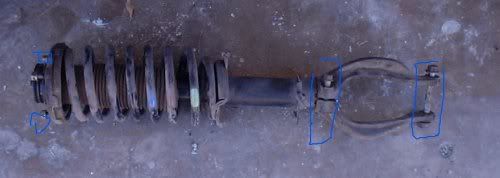
Stock removal can be done a few ways. Here is a picture of ALL the nuts and bolts required to be removed.

Image


Step 1. Lift the car off the ground AND unscrew all the ABS and brake wires/hoses. You don't have to remove the calipers.

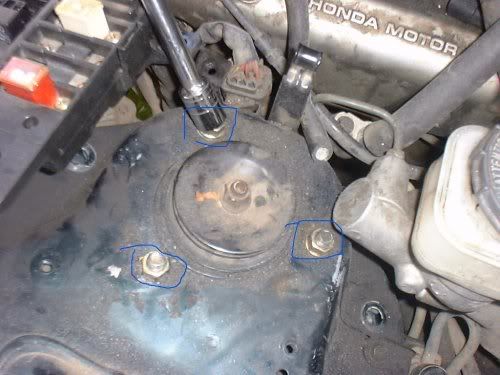
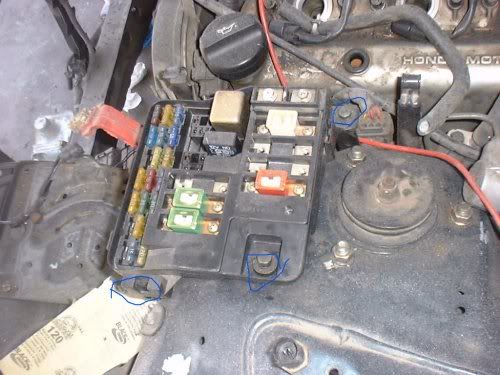
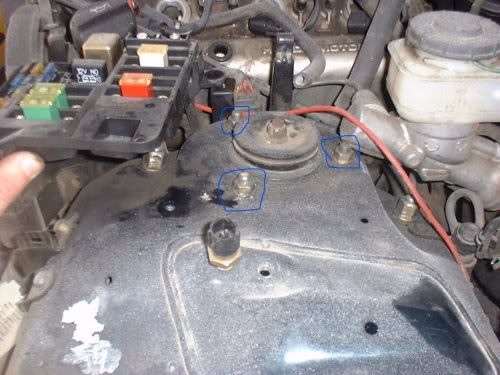
Step 2. Remove the (3) 14mm nuts from inside the engine bay
not to remove the one in the middle since it is under pressure from the spring.
Image


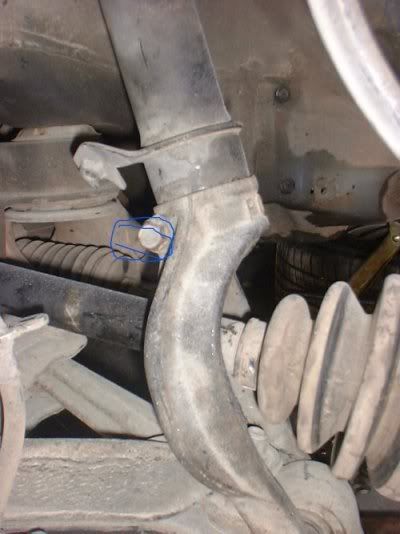
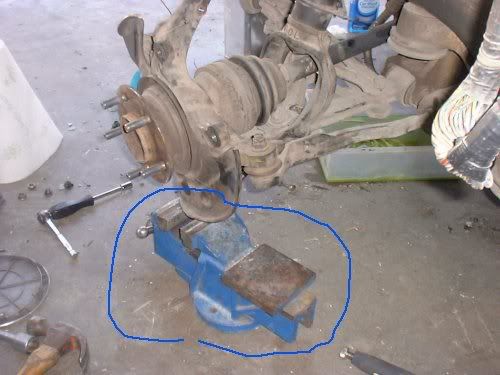
step 3. Remove the Shock TO stock fork bolt. You will need a 17mm Socket

Image

Image


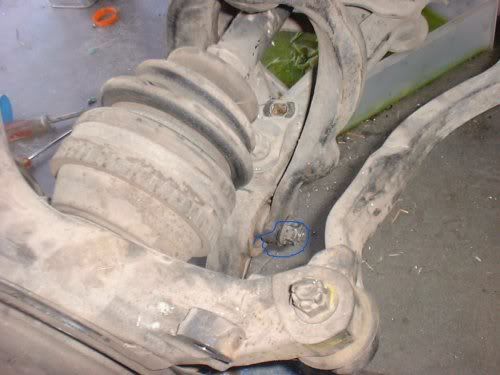
step 4. Now remove the fork bolt and nut. A 17mm socket is required. AFter you do this, the assembly will fall onto the axle. I would but a cloth inbetween the axle and stock fork just to be safe.

Image


Image


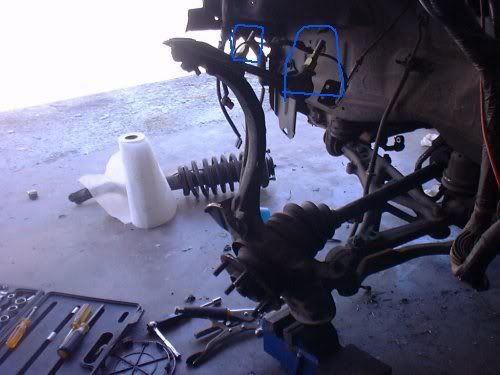
step 6. Now, to give yourself some extra space to work with, remove the upper control arm. Do do this, remove the (2) 17mm nuts in the engine bay.
DRIVERS SIDE: You can easily access them.
PASSENGER SIDE: You will have remove 2 bolts on the fuse box and use a wrench to get inside there.

Passangers side Upper control arm bolts:

Image


Image


ONce the upper control arm is free, do not remove it from the knuckle. Just let is hang there.
CAUTION: Do not pull the knuckle to far away from the car or the inner axle might pop out of the halfshaft and then you'l have to remove the axle to correct this.
Image


Now you'll have enough space to remove the Shock.
To install, I recommend you first connect the top of the shock to the engine bay (as in step 2).

CAUTION: Do not pull the knuckle to far away from the car or the inner axle might pop out of the halfshaft.
 
#12 ·
ok so what if the knuckle joint dies come out, because I think mine did I cant get my upper control arm to go back into place. and it feels like my axle has slipped out but Ican still turn the wheel and get the other wheel to turn too. . . help:(
 
#13 ·
IMDKING said:
I've been searching on the site, and I found this thread.

Question: I need to change the shock. How do I continue from the end of these instructions
I do not have a shock disassembly DIY. I can tell you a spring compressor will be needed. A warning: the spring is under extreme pressure and will spring up into your face if you remove the hardware keeping it down.

Telion said:
ok so what if the knuckle joint dies come out, because I think mine did I cant get my upper control arm to go back into place. and it feels like my axle has slipped out but Ican still turn the wheel and get the other wheel to turn too. . . help
I'm a little lost... You should place the axle though the knuckle first, then use the hub nut to secure it into place. Then move the upper control arm outwards (towards you) and then slide the axle into the differential. I then held the top of the knuckle and pushed it towards the car in order to get the axle to "pop" it into the differetial.

Did you read my caution: CAUTION: Do not pull the knuckle to far away from the car or the inner axle might pop out of the halfshaft and then you'l have to remove the axle to correct this. You might have to remove the boot :(
 
#14 ·
Great stuff guys, I am wondering if there is any DIY on the rear shock removal and install?
 
#15 ·
I have a lot of pics that I can add to the front shock DIY if anyone needs them until I add them in send me a PM with your email address and I will email them to you.
 
#17 ·
Installing Koni Shock Absorbers (Front)


I took out the shock absorber, but I'm at lost as to how to install this Koni shock absorber.

AJUSA - 1993 ACURA LEGEND - KONI - 6 #6.

I don't know if I have the right part(s) in the first place.

Image
^

I didn't even see the instruction that suppose to come with parts I ordered. The parts look different from what I saw online.

Any help would be greatly appreciated.

1993 Legend L
 
#18 ·
I took out the shock absorber, but I'm at lost as to how to install this Koni shock absorber.

AJUSA - 1993 ACURA LEGEND - KONI - 6 #6.

I don't know if I have the right part(s) in the first place.

Image
^

I didn't even see the instruction that suppose to come with parts I ordered. The parts look different from what I saw online.

Any help would be greatly appreciated.

1993 Legend L
Thats a shock absorber not a strut. I beleive the legend has no shock absorbers all struts. but i dont have mine here to look at .
 
#22 ·
What if you get something like Ksports will they pretty much plug anplay if you can perferom this DIY??? hey telion was your axle out, and idd it happen easy or from moving that thing out alot?? and how hard was it to get back in there ????
 
#23 · (Edited)
Time-saving tips

I replaced my front-left shock (damper ) yestersday, 2 days after front-right . Here's what I learned:

1. Don't try to take out the center nut (14mm) that holds the shock in place, as some of the posters strongly urged not to do. Long story short...I did that, thinking I didn't really need to compress that strut spring. I spent a long time hunting down for the 14mm socket and (luckily) 14 mm nut--the spring blasted them away for about 25 feets along with the driver.

2. Don't use the spring (strut) compressor from O'Reilly, if you can avoid it. Use the one that is design for Legend's spring. See the link for detail :Acura Legend Online Service Manual (Page: 0650)

3. If you don't have impact driver, but do have a drill, get yourself socket adapters; it comes in 3 and can be bought at Wal-Mart.

  • Once you loosen up certain nuts, you can use your drill to unscrew or unbolt them out quickly. Try using the drill at lower torque first...BECAREFUL...if the nut is too tight, don't try to force the nut out using the drill; that might cause the drill to smoke out.

  • You can use the drill with the socket adapter ( using 15/16 socket??) to speed up the compressing and decompressing of the spring. If you decide to to that, be very careful not to overwork the drill.

3. As someone mentioned somewhere in the forum, place the towel or thick cloth under the shock to prevent the boot from getting cut.

4. Before installing the shock (damper), be sure you have all the parts you need to complete the job, such as BUMP STOP. See the link for detail : Acura Legend Online Service Manual (Page: 0651).

Because I was such in a hurry and didn't do my homework, I left out the BUMP STOP ( rubber bushing?) which locates between the DUST COVER PLATE and BUMP STOP PLATE. When I took the shock out I didn't obviously see BUMP STOP, just red, wet powder-like substance stuck to the inside of DUST COVER. I wondered what it was. I hope the car run alright without that BUMP STOPs. I'll install them once I have them ordered. Bummmer...:(

5. Take notice the position (facing direction, etc.) of each washer, plate, etc. before you disassemble them.

6. When you are ready to mount the shock to the car, be sure the dent part on the lower side near the bottom of the shock (damper) is PARALLEL to the bolt (has no nut and shorter than the lowest one) that will squeeze and hold the bottom of the shock in place. I recommend color coding the one of the mounting hole and one tip of the 3 bolts, using white-out or similar, so you'll know the bolts are going into the right holes before you start tighten them.

7. Have a set of Allyn-Wrench ready, just in case you need to tighten the center nut. The bolt of the center should stick out of that center nut once you finished installing the shock; otherwise, the shock might not be properly mounted, and all you would be doing is rotating the shock's shaft in full circle.

Good luck!